このブログは、株式会社フィックスターズのエンジニアが、あらゆるテーマについて自由に書いているブログです。
Llama 4 をオンプレミス環境で動かしてみた
2025年4月6日、Llama 4 が公開されました。Llama 4 は画像、動画の入力が可能なマルチモーダルモデルで、109B パラメータの Llama 4 Scout、400B パラメータの Llama 4 Maverick、 2000B パラメータの Llama 4 Behemoth というラインナップとなっています。現時点ではこのうち Scout, Maverick の 2 種類が公開されています。
プレスリリースによると、Scout は最大1000万トークンものロングコンテキストで動作し、 20 時間の動画を入力することができると記載されています。このような大容量のデータを扱う LLM は、今までのように API アクセスを経由して利用するのではなく、オンプレミスで動作させることも妥当な選択肢となります。そこで今回は、Llama 4 Scout をオンプレミスで動作させることを想定して、動作確認とプロファイリングを行います。
Llama 4 の動作確認
まずは公式の手順に従って、transformersライブラリを用いて動作確認を行います。この手順では量子化を用いず FP16 精度でそのまま動作させるために、 H100 GPU が4枚必要となっています。
まず、 Llama 4 はアクセスするために認証が必要な gated model となっているので、 https://huggingface.co/meta-llama/Llama-4-Scout-17B-16E-Instruct からアクセス権を申請します。今回は10分程度で認証されました。
その間に環境構築を行います。公式のスクリプトを正しく動作させるには、手順書に記載されている transformers 以外にもいくつか追加でライブラリをインストールする必要があります。
requirements.txt に下記の内容を記載します。
pillow
transformers
accelerate
huggingface_hub[hf_xet]
torch
torchvision
この requirements.txt ファイルを参照して各ライブラリをインストールします。
uv venv -p 3.11
. .venv/bin/activate
uv pip install -r requirements.txt
今回は下記のバージョンがインストールされました。
Installed 42 packages in 3.06s
 + accelerate==1.6.0
 + certifi==2025.1.31
 + charset-normalizer==3.4.1
 + filelock==3.18.0
 + fsspec==2025.3.2
 + hf-xet==1.0.0
 + huggingface-hub==0.30.1
 + idna==3.10
 + jinja2==3.1.6
 + markupsafe==3.0.2
 + mpmath==1.3.0
 + networkx==3.4.2
 + numpy==2.2.4
 + nvidia-cublas-cu12==12.4.5.8
 + nvidia-cuda-cupti-cu12==12.4.127
 + nvidia-cuda-nvrtc-cu12==12.4.127
 + nvidia-cuda-runtime-cu12==12.4.127
 + nvidia-cudnn-cu12==9.1.0.70
 + nvidia-cufft-cu12==11.2.1.3
 + nvidia-curand-cu12==10.3.5.147
 + nvidia-cusolver-cu12==11.6.1.9
 + nvidia-cusparse-cu12==12.3.1.170
 + nvidia-cusparselt-cu12==0.6.2
 + nvidia-nccl-cu12==2.21.5
 + nvidia-nvjitlink-cu12==12.4.127
 + nvidia-nvtx-cu12==12.4.127
 + packaging==24.2
 + pillow==11.1.0
 + psutil==7.0.0
 + pyyaml==6.0.2
 + regex==2024.11.6
 + requests==2.32.3
 + safetensors==0.5.3
 + sympy==1.13.1
 + tokenizers==0.21.1
 + torch==2.6.0
 + torchvision==0.21.0
 + tqdm==4.67.1
 + transformers==4.51.0
 + triton==3.2.0
 + typing-extensions==4.13.1
 + urllib3==2.3.0
次に、アクセス権が得られたことを確認してから、 huggingface-cli を利用してモデルをダウンロードします。 https://huggingface.co/settings/tokens からアクセストークンを作成して、CLI 上からログインします。
huggingface-cli login
モデルダウンロードは下記のコマンドで行うことができます。
huggingface-cli download meta-llama/Llama-4-Scout-17B-16E-Instruct
公式スクリプトをカレントディレクトリにコピーして、モデル名を変更します。
現時点では flex_attention ライブラリとの互換性が無くエラーになるため、ここでは attn_implementation の指定をコメントアウトします。
修正後のスクリプトを次に示します。
from transformers import AutoProcessor, Llama4ForConditionalGeneration
import torch

# model_id = "meta-llama/Llama-4-Maverick-17B-128E-Instruct"
model_id = "meta-llama/Llama-4-Scout-17B-16E-Instruct"

processor = AutoProcessor.from_pretrained(model_id)
model = Llama4ForConditionalGeneration.from_pretrained(
    model_id,
    # attn_implementation="flex_attention",
    device_map="auto",
    torch_dtype=torch.bfloat16,
)

url1 = "https://huggingface.co/datasets/huggingface/documentation-images/resolve/0052a70beed5bf71b92610a43a52df6d286cd5f3/diffusers/rabbit.jpg"
url2 = "https://huggingface.co/datasets/huggingface/documentation-images/resolve/main/datasets/cat_style_layout.png"
messages = [
    {
        "role": "user",
        "content": [
            {"type": "image", "url": url1},
            {"type": "image", "url": url2},
            {"type": "text", "text": "Can you describe how these two images are similar, and how they differ?"},
        ]
    },
]

inputs = processor.apply_chat_template(
    messages,
    add_generation_prompt=True,
    tokenize=True,
    return_dict=True,
    return_tensors="pt",
).to(model.device)

outputs = model.generate(
    **inputs,
    max_new_tokens=256,
)

response = processor.batch_decode(outputs[:, inputs["input_ids"].shape[-1]:])[0]
print(response)
print(outputs[0])
4GPU を指定して実行します。
CUDA_VISIBLE_DEVICES=0,1,2,3 python llama4.py
正常に終了し、次のような結果が得られました。モデルに与えた指示の通り、2枚の画像について類似点と相違点が正しく説明されています。
The two images depict anthropomorphic animals, a rabbit and a cat, dressed in similar attire. The rabbit is standing on a dirt path with flowers and houses in the background, while the cat is sitting on a stone path surrounded by greenery.

**Similarities:**

* Both characters are wearing blue jackets, brown vests, and bow ties.
* They have similar facial expressions, with large eyes and endearing features.
* The backgrounds of both images feature natural settings, including paths, flowers, and houses.

**Differences:**

* **Species:** The most obvious difference is that one character is a rabbit and the other is a cat.
* **Posture:** The rabbit is standing upright on two legs, while the cat is sitting on all fours.
* **Background:** Although both backgrounds feature natural settings, they differ in terms of composition. The rabbit's background includes a house and mountains, whereas the cat's background features a more intimate garden scene with a wooden fence.
* **Coloring:** The rabbit has lighter-colored fur than the cat, which has darker orange tones.

Overall, while the two images share some similarities in terms of character design and setting, they also exhibit distinct differences in terms of species, posture, and background composition.
プロファイリング
次に、このスクリプトについて NVIDIA NSight Systems (nsys) を用いたプロファイリングを実施します。 nsys profile コマンドを使うとプロファイリング結果の .nsys-rep ファイルが生成されます。
CUDA_VISIBLE_DEVICES=0,1,2,3 nsys profile python llama4.py
生成された .nsys-rep ファイルを NVIDIA Nsight Systems GUI で開くと、次のようなプロファイリング結果が得られます。

全体的に、 GPU0 が動いてから GPU1, 2, 3 と順番に動いている様子が観測できます。これは、並列化の手法として pipeline parallel が用いられていて、基本的にレイヤごとに逐次的に動作していることを意味します。
プロファイル結果について詳細を見ていきます。緑色に見えている部分では、モデルの重みをロードしています。そのあとしばらくは、入力トークンすべてを並列処理する prefill ステージ、そのあと1トークンずつ逐次生成する decode ステージが実行されていることがわかります。

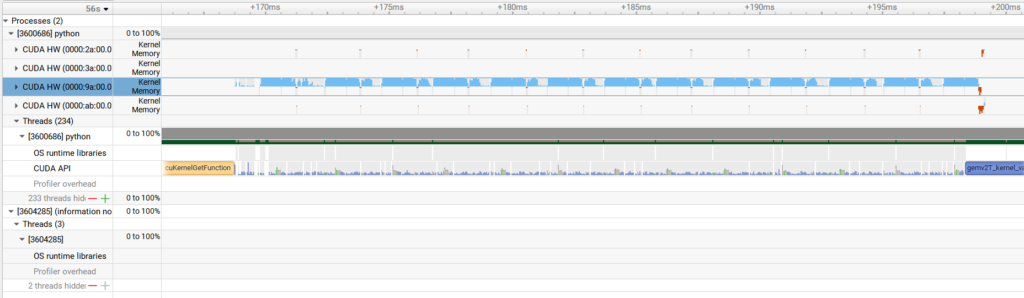
prefill ステージの部分をレイヤ単位まで拡大すると、大部分でカーネルの実行がされていることが分かります。少なくとも単一の GPU の上では、適切な PyTorch 関数の呼び出しによって効率的に実行されていることが分かります。
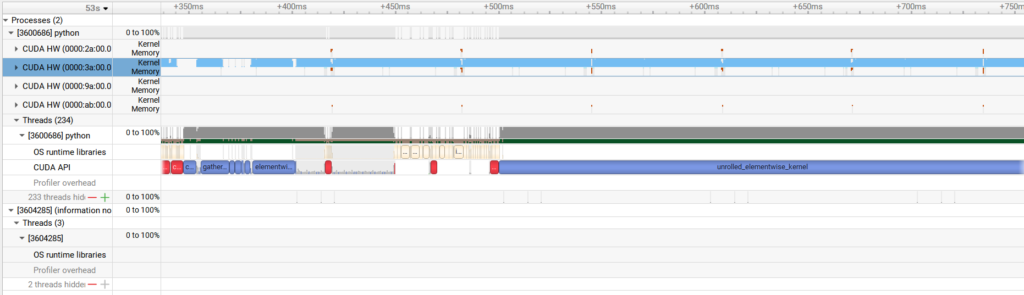
decode ステージは、これに比べると GPU が使われていない部分が残っています。トークンごとの推論で計算量が比較的小さいことに加えて、 Llama 4 から MoE アーキテクチャが採用されて計算量がさらに減っていることから、 GPU の計算リソースを十分に活用しきれていないことが分かります。
今回はエラーによって flex_attention をオフにした状態での測定でしたが、Llama 4 で利用されている ChunkedAttention が正しく動くようになれば、実行速度やプロファイル結果も改善されることが期待できます。
ただし、Llama 4 に限らず一般に transformers ライブラリのデフォルト設定は並列性能に特化しておらず、推論サービスとして Llama 4 を展開する際には vLLM など別のライブラリを利用するほうが良いと考えられます。
まとめ
今回は Llama 4 の動作確認を行い、プロファイリングを実施しました。最新の高性能な LLM はますます巨大化・複雑化しており、ローカルで動かすことを考えると並列化の戦略も含めてさまざまな工夫が必要であることがわかりました。また、動作確認にスクリプトの修正が必要だったことからもわかる通り、簡単かつ高速に動かすための手順はあまり整備されておらず、ローカル LLM 活用の障壁になっていることも考えられます。今後も引き続き Llama 4 を含めた LLM の学習・推論について調査し公開することで、ローカル LLM の普及に貢献していきたいと考えています。

Tags
About Author
kota.iizuka
Leave a Comment
Tags
Favorite Post
 2023年1月27日
 2017年8月22日
Archives
- 2026年2月
- 2026年1月
- 2025年12月
- 2025年11月
- 2025年8月
- 2025年5月
- 2025年4月
- 2024年11月
- 2024年10月
- 2024年7月
- 2024年5月
- 2024年4月
- 2024年2月
- 2024年1月
- 2023年12月
- 2023年6月
- 2023年5月
- 2023年4月
- 2023年2月
- 2023年1月
- 2022年12月
- 2022年10月
- 2021年11月
- 2021年9月
- 2021年6月
- 2021年3月
- 2021年2月
- 2020年12月
- 2020年10月
- 2020年7月
- 2020年6月
- 2020年5月
- 2020年4月
- 2020年3月
- 2020年2月
- 2020年1月
- 2019年12月
- 2019年11月
- 2019年10月
- 2019年9月
- 2019年8月
- 2019年6月
- 2019年4月
- 2019年3月
- 2019年2月
- 2019年1月
- 2018年12月
- 2018年11月
- 2018年10月
- 2018年8月
- 2018年6月
- 2018年5月
- 2018年4月
- 2018年3月
- 2018年2月
- 2017年12月
- 2017年11月
- 2017年10月
- 2017年9月
- 2017年8月
- 2017年7月
- 2017年6月
- 2017年5月
- 2017年3月
- 2016年12月
- 2016年11月
- 2016年8月
- 2016年7月
- 2016年3月
- 2016年2月
- 2016年1月
- 2015年12月
- 2015年11月
- 2015年10月
- 2015年8月
- 2015年6月
- 2015年3月
- 2015年2月
- 2015年1月
- 2014年12月
- 2014年11月
keisuke.kimura in Livox Mid-360をROS1/ROS2で動かしてみた
Sorry for the delay in replying. I have done SLAM (FAST_LIO) with Livox MID360, but for various reasons I have not be...
Miya in ウエハースケールエンジン向けSimulated Annealingを複数タイルによる並列化で実装しました
作成されたプロファイラがとても良さそうです :) ぜひ詳細を書いていただきたいです!...
Deivaprakash in Livox Mid-360をROS1/ROS2で動かしてみた
Hey guys myself deiva from India currently i am working in this Livox MID360 and eager to knwo whether you have done the...
岩崎システム設計 岩崎 満 in Alveo U50で10G Ethernetを試してみる
仕事の都合で、検索を行い、御社サイトにたどりつきました。 内容は大変参考になりま�...
Prabuddhi Wariyapperuma in Livox Mid-360をROS1/ROS2で動かしてみた
This issue was sorted....